Egyptian leather art journal

When my granddad was in the RAF during WW2 he was stationed in the Middle East and on his travels bought a handbag for my Nan. I think it’s made of Egyptian leather and there are beautiful hand tooled designs on the exterior. It’s not very practical as a handbag though as the inside is stiff and the very opposite of capacious. It’s been stashed in a cupboard for over 20 years, since I was given it after Nan’s death. The inside zipper was rusted, the silvering on the mirror was gone and I suspect that Nan hadn’t used it for years herself because it still had some very old photos of my Granddad and Mum inside. So what to do? I took a deep breath, a very sharp craft knife and cut out the inside! I bound a stack of pages together with my Zutter (different quality sketchbook pages plus some manilla folders). and attached the bound pages to the cover by making three holes in the ‘spine’ of the handbag and threading leather cord up the binding wires and out through the holes. I’m so pleased with it.. it will finally get some use and it feels lovely and soft now the stiff interior has been removed. I’m going to write about the story of the bag and tuck it into one of the pockets. And when I’ve used up the journal I can remove the leather cord and add another. A perpetual art journal!


Sorry:
- Please recheck your ID(s).
- If you are showing a private album, check that the "Retrieve Photos From" option is set to "User's Private Album" and that the Authorization Key is correct.

‘Tis the season…

to make craft projects for your loved ones!

I made the chalkboard from a photo frame. I removed the glass and painted the backboard with a couple of coats of blackboard paint.  The lettering was adapted from a file on the Silhouette store by s.e.i  and cut from vinyl.  I hot glued a button to the side of the frame after attaching twine and chalk.

The card was simply a heart shaped cutout laid over stripes of Washi tape

I didn’t make the daffodils – © Mother Nature.

valentines_chalkboard

Birthday challenge

This is my first foray into the creative world of the Silhouette Challenge.   This month’s theme was fabric and you’ll find links to 43 inspirational projects below mine.   Go visit them all!

silhouette400x200hooktool

It’s always a bit scary photographing a sewing project and seeing all the imperfections close up, but although this is no work of breathtaking skill it was made with love.  This was for my granddaughter’s first birthday. At Christmas I made her a card with her favourite dog and a photo of her underneath the flap.  Peep-po is such a cool game for a nearly one year old!   For her birthday I wanted to try a similar theme but something a little more robust so I came up with this tiny play quilt.

I cut the letters with the Silhouette Cameo using plain old iron-on interface to back the fabric with varying degrees of success, but after several attempts managed to get what I needed.  The cartoon dog image was printed and cut from iron-on t shirt transfer paper.  I then used the same outline (flipped) to cut the shape out of iron-on interfacing.  I lined up the printed image and the interfacing face and ironed them both onto the dark brown faux suede, so the image was transferred straight to the interfacing.  I know this is not the conventional way to transfer (I didn’t have any white fabric that was suitable to hand!) but I gave this a try and it seems to work.

For the square in the centre, underneath the padded dog,  I used the same technique to add a photo of the birthday girl.

I sewed the squares together, added batting and backing, quilted using stitch-in-the-ditch and bound the edges.  I attached the centre pull-up square with velcro so it would pull off easily rather than rip!

birthday_challenge

Want to Check Out More Silhouette Projects?

My Silhouette Challenge buddies and I are all sharing projects on our blogs today, so peruse the projects below for a wealth of Silhouette inspiration!

Silhouettechallengecollage

  1. No-Sew Valentine’s Day Pillows by A Tossed Salad Life
  2. No-Sew Interchangeable Fabric Bunting by unOriginal Mom
  3. Monogrammed Burlap Garden Flag by The Turquoise Home
  4. Crawl, Walk, Bike by It’s Always Craft Time
  5. Freezer Paper Stenciled Tote Bags by Weekend Craft
  6. DIY Bleach Spray Shirt by Practically Functional
  7. Stenciling Sherlock by Please Excuse My Craftermath…
  8. Felt Star Wands by Cutesy Crafts
  9. Yoda Kid’s T-Shirt by Architecture of a Mom
  10. Mark Your Territory- Dog Flags by Black and White Obsession
  11. Nautical Pillows by Lil’ Mrs. Tori
  12. Big Sister Gift & Silhouette Cut File by Creative Ramblings
  13. Nerdy Baby Onesies + Free Cut File by Essentially Eclectic
  14. Easy Easter Bunny Onesie – Silhouette Cameo Craft by Adventures in All Things Food & Family
  15. Fabric Envelopes for LEARNING LETTERS! (& cut file) by From Wine to Whine
  16. “Good Morning, Sunshine!” Memo Board by Tried & True
  17. Hearts-A-Lot Burlap Pillow Cover by My Paper Craze
  18. Baby Quilt by Dragonfly & Lily Pads
  19. Surprise Holiday Banner by Whats Next Ma
  20. “Team Betty” Tote Bag by The Thinking Closet
  21. DIY Sock Minion by Create it. Go!
  22. Pretty Up Some Organza Bags by Getsilvered
  23. Easy Heart Appliqued Onsies by Create & Babble
  24. Bleach Pen Gel & Freezer Paper Stencils Made with the Silhouette Machine by Bringing Creativity 2 Life
  25. Valentines Baby Onesie & Boy’s Shirt + Free Cut Files by The Frill of Life
  26. Valentine’s OWL Always Love You T-shirt by My Favorite Finds
  27. DIY Screen Printed Curtains by Chicken Scratch NY
  28. Fabric Painted Quilted Wall Hanging by Terri Johnson Creates
  29. Glitter Iron-On Top by Simply Kelly Designs
  30. DIY Monogrammed T-shirts with Silhouette Heat Transfer Material by Pitter and Glink
  31. Birthday Challenge by Fadville
  32. Machine Applique with SIlhouette Cameo by The Sensory Emporium
  33. Fabric Applique Valentine’s Day T-Shirt by DailyDwelling
  34. “Cute as Cupid” shirt by crafts, cakes, and cats
  35. Sew Cute Applique by Life After Laundry
  36. Rhino Onesie by It Happens in a Blink
  37. Upcycled Birchbox Cameo Accesory Organizer by Cupcakes&Crowbars
  38. Customizing textiles with Heat Transfer Vinyl (working title) by feto soap
  39. Easy Fabric Art by McCall Manor
  40. Lady Bug Tote Bag with Silhouette Rhinestones by Ginger Snap Crafts
  41. Mommy and Em’s Coordinated Aprons by TitiCrafty
  42. Canvas sketch project and a share by Clever Someday
  43. Foxy Lady Pajamas by Mabey She Made It
  44. Teddy Bear by Work in Progress


Bohemian swing

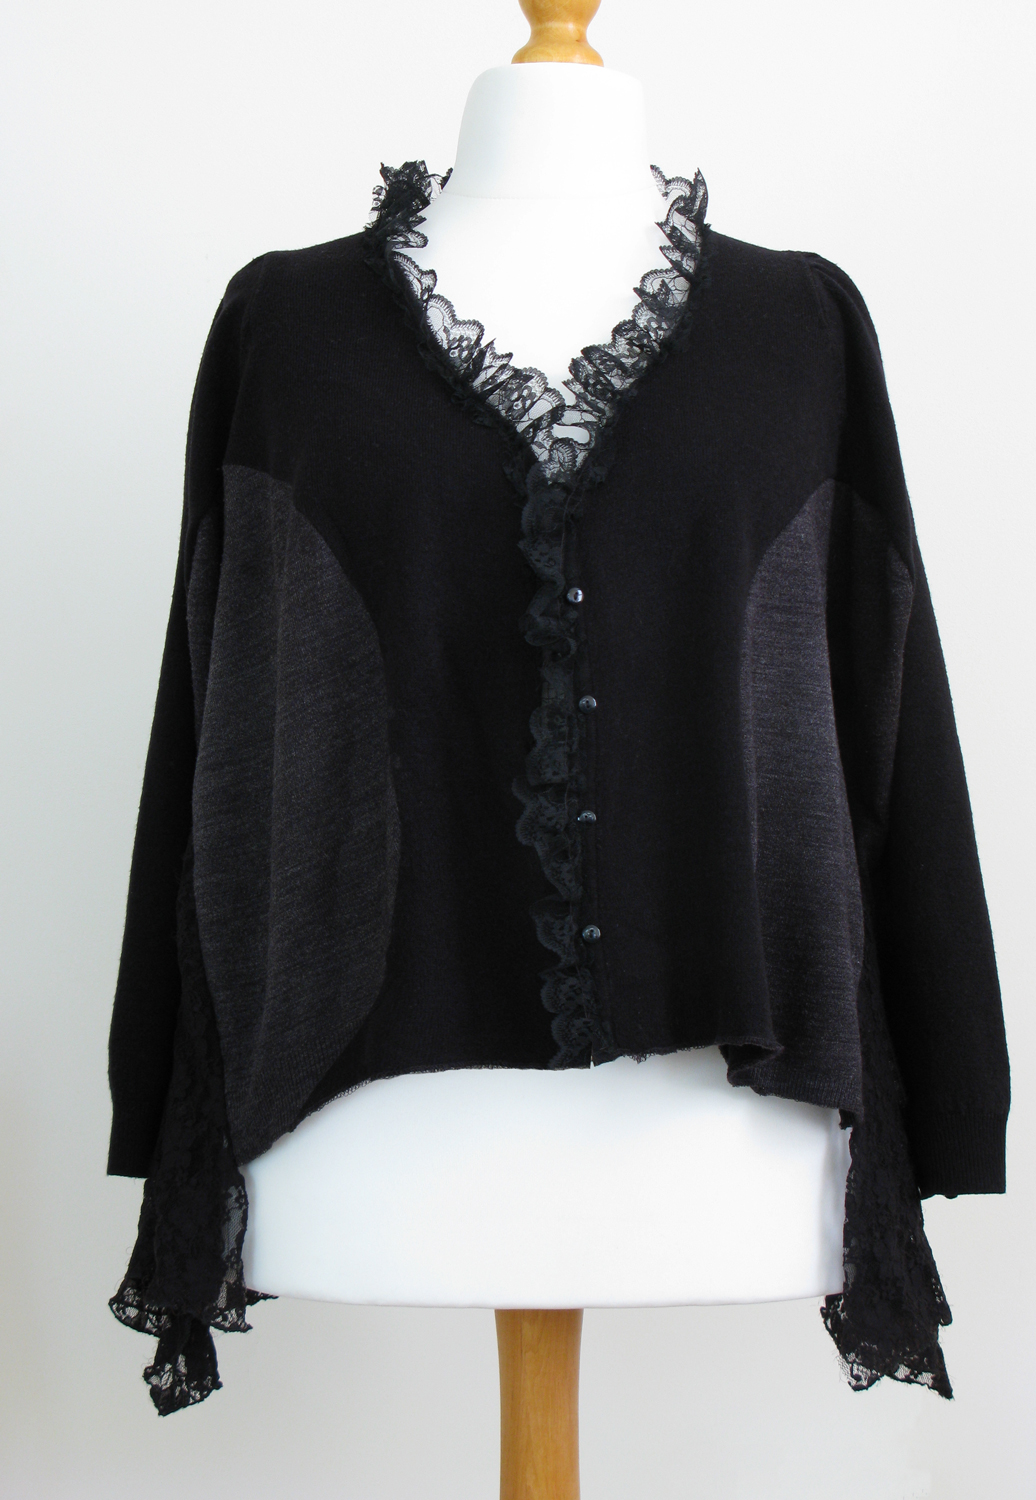
Again I forgot to photograph the ‘before’ but this was a standard, crew neck sweater, another charity shop purchase cost about £3.  I forgot to mention that the first step I take with any of these charity shop purchases is to throw them in the washing machine.   If they don’t survive, well shrug….. but they do need to be clean!

I cut out the crew neck, made a small pleat in the centre front and covered the raw edges of the new neckline with a strip of lace from an old skirt.

I chopped off the sleeves that were VERY long, then reattached part of them to form a faux cuff.

I opened up the side seams, chopped off the sleeves from a cream lace blouse and cut them into long triangles.  I sewed the lace triangles into the side seams.

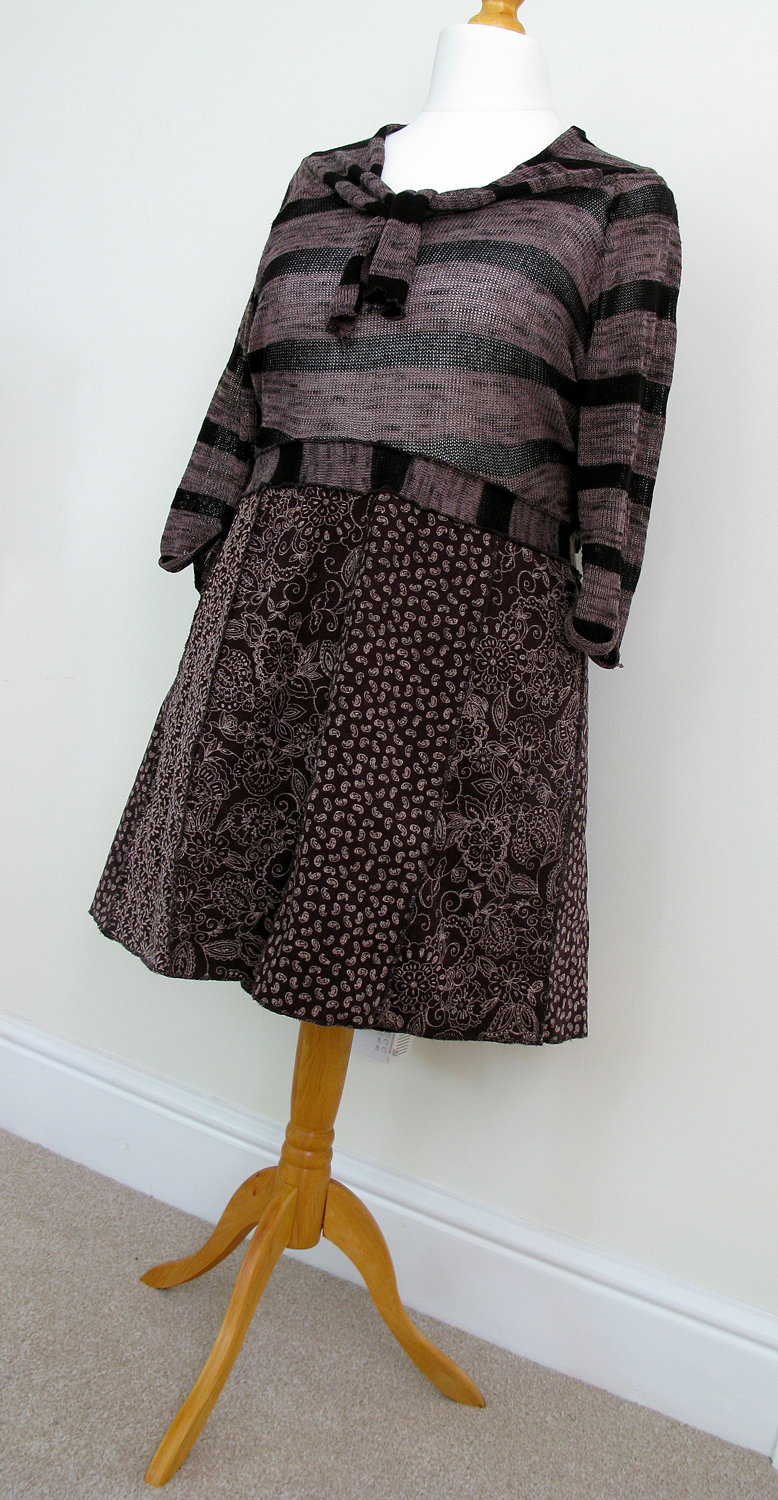
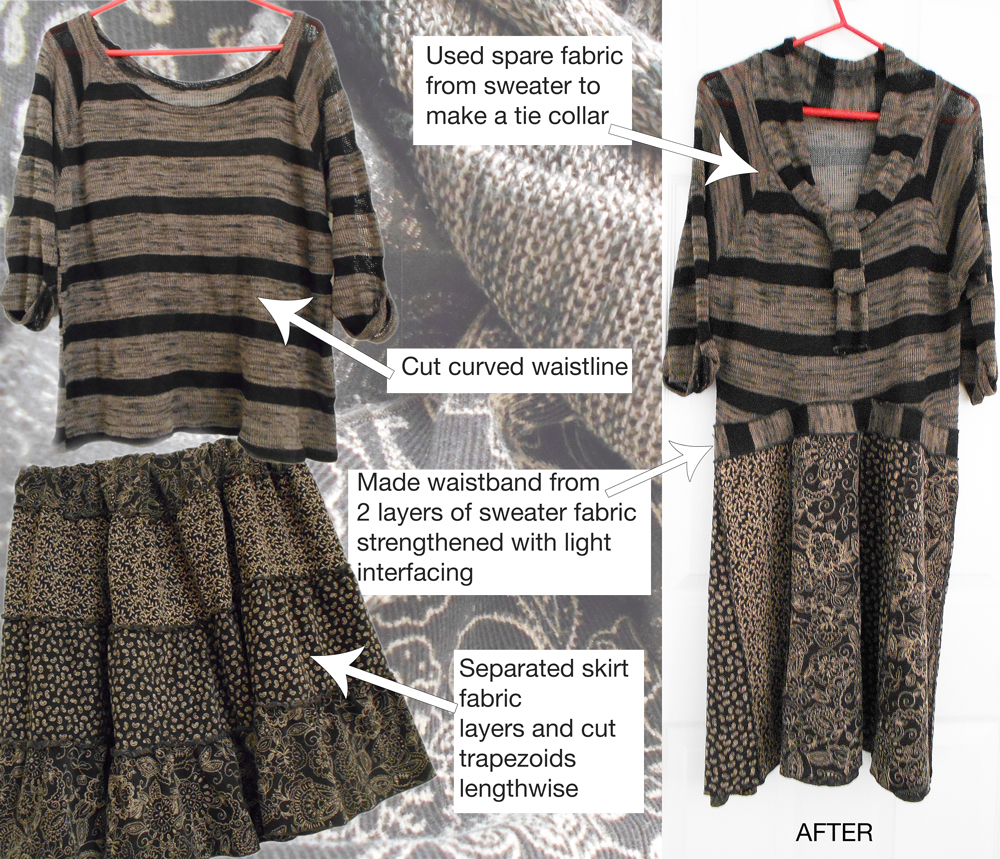
I cut the ribbing off the bottom and attached the lace and satin panel from the skirt.  Et voila a new bohemian style top with a bit of swing.  I still think there’s something missing from this one.  Tempted to make a fabric flower to sit on the neckline at the top of the pleat.

Edit: here’s the finishing touch.

flower
creamtunic_collage

2 become….

one.  No, nothing to do with romance – more about splicing a couple of old cardigans into something wearable.  I forgot to take the ‘before’ pics but imagine two plain small cardigans, bog-standard, button up to the neck, one black, one grey, picked up at a local charity shop for 99p each.   These were very small, so I cut halfway up along the sleeve lengthwise and then, without stopping for breath, cut a curve across the front and back.  I did this to both cardigans with the curve of the black cardigan being slightly smaller than the grey.  I sewed them together along the sleeve and curves, slashed the side seams and added a generous triangle of lace, cut a V neck and trimmed with lace.   The side seam lace came from another charity shop top – cost £1, so total was just under £3.

black_grey_cardigan

Upcycling – Take 2

I wasn’t happy with hanging up clothes to photograph them, this dress/tunic looked weird and stretchy so I bought a dummy.  It’s not a fancy pants adjustable dressmaker’s dummy, just a polystyrene display model but it does the job for photos and I can stick pins in it.  Result!

dummy1

Upcycling

I’m not sure why upcycling clothes has only just appeared on my horizon.  I have a wardrobe full of clothes that don’t get worn for one reason or another, stacks of fabric and trimmings and I live within a five minutes walk of about a dozen charity shops.  So belated though it is, this week I took a few tentative steps towards reconstructed fashion and this was my first attempt.

I bought the lightweight jumper and fine corduroy skirt from a charity shop, chopped them up and sewed them together again.  What fun!  It probably wasn’t the best idea to use a knitted fabric to support even lightweight corduroy.  You may be able to see from the photo that it stretches horribly when hung up.  However, it’s fine when I’m wearing it because I don’t have a straight up and down shape (!) So thanks in no small part to my hips (never thought I’d say that!) it fits pretty well as a knee length tunic to wear over leggings.  I’m generally pleased with the end result – I’m already eyeing the contents of my wardrobe for the next victims.

upcycling01